Vacation Home Photography Tips: Capture Your Property’s Best Features
Better photos mean more interest in your vacation home. Find out how to stage, take and edit photos that showcase your property's unique features.


What’s the first thing a potential guest notices about a vacation home? The photos. In the digital age, your listing images are your property’s handshake, mood-setter, and make-or-break sales pitch.
Crisp, warm, and thoughtfully composed photography doesn’t just reflect what your space looks like; it communicates how it feels to stay there.
If you’re part of the HomeExchange Collection community or thinking about joining, you already understand the value of making your property stand out.
Stunning photography can mean the difference between being bookmarked or passed over. Whether you’re a seasoned vacation home owner or listing your home for the first time, learning how to take great photos of your home is one of the smartest things you can do.
In this post, we’ll walk you through practical vacation photography tips that help showcase your property’s unique features and make your listing shine.
Start by getting your space photo-ready
Before you even think about picking up a camera, focus on preparation. A well-staged home leads to better photos and a stronger emotional connection with potential guests.
Consider the following:
- Declutter: Remove personal items such as toiletries, family photos, and clutter. A clean, neutral space allows guests to envision themselves there. Don’t forget to tidy closets, drawers, and storage spaces that may appear in photos.
- Highlight unique selling points: Set up your game room, organize outdoor furniture, or prep the hot tub. Consider photographing special features, such as fireplaces, reading corners, or custom artwork.
- Style intentionally: Add cozy touches like throw pillows, curated bookshelves, or fresh plants to bring warmth without overwhelming the scene. Keep the color scheme consistent and welcoming.
- Open curtains: Let in as much natural light as possible. Avoid poor lighting conditions that can make your home feel uninviting. Clean your windows inside and out to avoid distracting spots or smudges.
You can also create small vignettes in each room to suggest how the space is used, such as a breakfast nook set for two or a blanket draped over a reading chair.
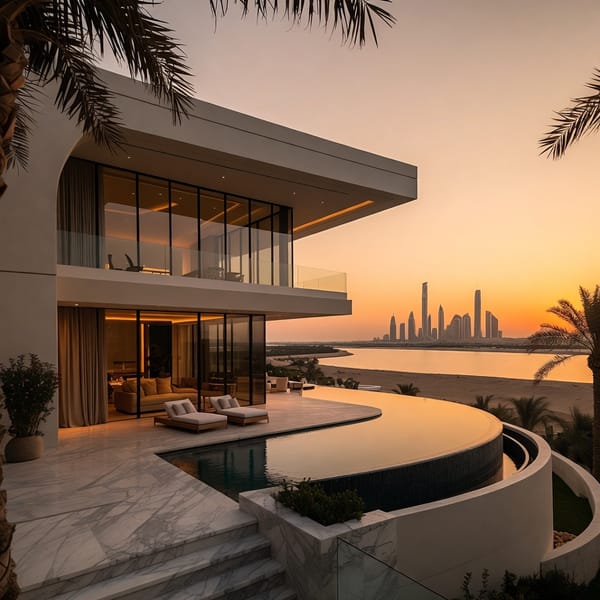
If you're listing your property through a home exchange platform, especially one like HomeExchange Collection, consider spotlighting luxury touches like spa bathrooms, high-end kitchens, or bespoke decor. These elevate your listing and show potential guests the care you've put into your home.
Use the right tools for clear shots
You don’t always need a professional camera, but the right equipment helps, especially if you’re taking photos yourself. To get the most out of your DIY photo session, keep these tips in mind:
- Use a tripod: It ensures well-composed images and keeps photos straight. It also allows for better consistency between shots.
- Opt for a wide-angle lens: This makes smaller rooms like bathrooms or entryways feel more spacious. Use this with care to avoid unnatural distortions.
- Adjust white balance: Whether you’re shooting interior shots or outdoor spaces, getting the color temperature right can make or break your visuals. Warmer tones generally feel more inviting.
- Use a professional camera or smartphone with manual settings: Many modern phones can produce high-quality photos if you understand how to use them. Look for features like HDR, night mode, and grid overlays to assist with framing.
- Clean your lens: Whether using a smartphone or DSLR, smudges can create blurry, hazy images.
If your listing includes accessibility features or sustainable elements like solar panels, consider capturing those as well, especially if they are a key part of your property’s unique appeal.
Also read our tips for How to take eye-catching photos for your home exchange profile
Utilize natural light for warmth and clarity
Natural light photography tips are central to any great vacation listing. Sunlight creates inviting, authentic images that artificial lighting can’t replicate.
Do the following:
- Shoot during the day: Late morning or early afternoon typically provides the best lighting for interior shots. Avoid midday when sunlight is harsh.
- Avoid poor lighting or mixed lighting: This can result in yellow hues or shadows that mislead potential guests. Choose one consistent light source for best results.
- Turn off artificial lights: They often clash with natural light and create uneven tones. If needed, use soft white bulbs that mimic daylight.
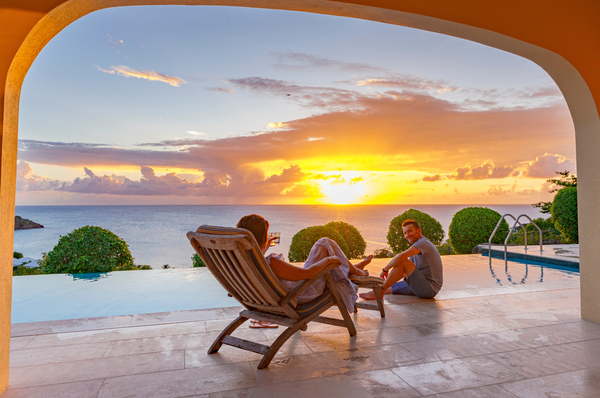
- Capture sunrise or sunset for exterior shots: Known as the golden hour, these times provide soft, flattering lighting and warm tones that enhance curb appeal.
Overcast days can also work in your favor, offering even light that prevents harsh shadows or glare. Always shoot with the light source behind you or to the side for best results.
Take advantage of open windows, skylights, and patio doors to create naturally bright photos that showcase your home’s openness and charm.
Focus on the spaces guests care about most
Think like your guest. Which rooms do people want to see first? Where do they imagine relaxing or making memories?
- Living room: Make this space shine with good composition, soft textures, and multiple angles. Consider photographing with the TV off to prevent screen glare.
- Kitchen and dining table: Set the table simply with coffee mugs, a bowl of fruit, or local bread. Clear countertops while leaving a few thoughtfully arranged items to suggest use.
- Bedrooms: Fluff the pillows, smooth the linens, and highlight any unique features like reading nooks or balcony views. Capture cozy nooks, mood lighting, or canopy beds.
- Bathrooms: Clean thoroughly and use close-up shots to showcase high-end finishes or accessibility features. Fold towels neatly and remove personal items like shampoo bottles.
- Outdoor spaces: Photograph patios, gardens, and outdoor furniture in natural light. Highlight any hot tub, hammock, or fire pit. Show angles that include views, fencing, or ambient lighting for evening shots.
Do not overlook small spaces that add character, such as mudrooms, laundry rooms, or even an organized closet.
Including local attractions such as nearby beaches, markets, or trails adds emotional value to your listing. Let potential guests imagine the lifestyle.
Use these pro photography tricks
Even without a professional photographer, there are ways to make your images stand out.
Follow these basic composition principles to elevate your photos:
- Use the rule of thirds: Place key items like a bed, sofa, or window along the lines or intersections to create balanced, visually appealing images. Most phones and cameras allow you to enable gridlines.
- Photograph from chest height: This offers a natural perspective that feels more immersive. Avoid overhead or floor-level angles unless you’re trying to highlight something specific.
- Capture different angles: One single photo will not showcase your property. Show the same room from multiple viewpoints to give a sense of depth and flow.
- Showcase your property’s flow: Try photographing through doorways to show how spaces connect. This helps guests understand the layout and movement.
- Avoid over-editing: Keep it real. Overexposed windows or extreme filters can make guests feel misled. Highlight natural beauty and avoid distractions.
Your goal is not perfection, it is connection. Create property photos that feel authentic but polished.
Take photos that tell a story
Think of your property photos as a visual tour. Start at the entrance and move logically through each room. Capture the spaces as a guest would experience them. This approach creates a cohesive flow and helps guests mentally walk through your home.
Photos that tell a story go beyond showing what is in a room. They express how someone will feel in it. Try including lifestyle details like an open book beside a cup of tea or a softly lit bedroom at twilight.
Know how many photos to include
Too few photos can leave guests with questions, while too many uncurated images can feel overwhelming. Aim for 20 to 30 well-chosen images that represent your home thoroughly.
Start with your best, most eye-catching photo. This is your main image and should reflect the mood and value of your home. Then include two to three images per room, a few shots of outdoor spaces, and close-ups of details or amenities. Include seasonal images if applicable to show the property’s appeal year-round.
Avoid repetitive images or showing the same space from slightly different angles. Quality always beats quantity.
Highlight your property’s unique features
Every home has its own personality. Maybe it’s a skylight in the bathroom, a backyard fire pit, or a vintage record player in the living room. Highlight these touches in your photography to differentiate your property from others.
Close-up shots can showcase texture, craftsmanship, or intentional design choices. Show how your space supports rest, connection, and inspiration. These personal touches build trust and elevate your listing.
If you’re part of any luxury home swapping community, such as HomeExchange Collection, emphasize what makes your home luxury-grade. Show off curated art collections, designer kitchens, or resort-style bathrooms. High-quality details matter to travelers seeking distinctive experiences.
Include seasonal and lifestyle shots
A great way to showcase your property’s versatility and charm is by incorporating seasonal and lifestyle shots. If your vacation home is located in an area with dramatic seasonal changes, update your listing photos to reflect the time of year.
- Seasonal imagery: Show your home surrounded by snow in winter, blooming flowers in spring, or golden leaves in fall. These details help potential guests envision what their stay might look like at different times of the year.
- Lifestyle details: Show guests using the space. Whether it's a family enjoying a board game in the living room or someone sipping coffee on the patio, these images create an emotional connection that flat-lay shots can't match.
Lifestyle shots are especially powerful in the vacation home business because they help guests imagine themselves living there, not just sleeping there.
Make accessibility and amenities visible
Many travelers now look for accommodations that suit their physical needs or lifestyle preferences. Ensure your photography communicates your property’s accessibility features and available amenities, such as:
- Accessible design: If you have a ramp, step-free entry, grab bars, or wide hallways, photograph these features clearly. Highlight how your space can accommodate all types of travelers.
- Modern comforts: Showcase your smart home systems, fast Wi-Fi setup, or fully equipped kitchen. High-tech or luxury appliances can be strong differentiators.
- Kid-friendly or pet-friendly touches: A crib in the corner, pet bowls on the floor, or a baby gate can reassure potential guests that your home suits their needs.
Edit smartly without overdoing it
Post-processing is the polish, not the fix. With the right photo editing tools, you can adjust colors and lighting while preserving the authenticity of your images.
- Use editing software like Lightroom or Canva: Boost brightness and contrast, straighten lines, and fix slight distortions. Use presets for consistency.
- Avoid unrealistic filters: Keep skin tones, fabrics, and walls true to life. If your home feels drastically different in person, guests may feel misled.
- Ensure consistency: Maintain a cohesive look across all your images for better visual appeal. Pick a style, such as light and airy or warm and moody, and stick to it.
Pro tip: Batch your editing. Edit one photo first, then apply the same settings to the rest for a unified feel.
Takeaway: showcase your home like a pro (even if you're not one)
You don’t need a huge budget or formal training to capture your home’s beauty. With a few tweaks, intentional prep, and thoughtful photography tips, you can produce high-quality images that attract potential guests and increase your listing’s visibility.
Vacation home photography is more than visuals; it’s storytelling. Every corner, every detail should express hospitality and warmth. When guests can see themselves in your space, they’re more likely to book.
Remember, your photos are your storefront. Make them count.
HomeExchange Collection homes thrive on trust, taste, and detail. Every property photo is an invitation, so make yours count.
If you're part of the HomeExchange Collection or considering joining, now’s the perfect time to refresh your vacation home photos. Discover how a stunning photo gallery can increase your guest engagement and elevate your travel exchange experience. Visit HomeExchange Collection to learn more.
FAQs
Here are the answers to some frequently asked questions about vacation home photography:
Should I hire a professional photographer to capture my vacation home?
If your budget allows, yes. A vacation home photographer can highlight your property’s best angles, manage lighting, and deliver high-quality images that stand out. However, with the right tools and guidance, DIY photography can also yield excellent results.
What is the rule of thirds in photography?
It’s a compositional guideline that divides your image into thirds, both horizontally and vertically. Placing points of interest at the intersections helps create balanced and visually engaging photos.
What is the 100 rule in photography?
The 100 rule relates to shutter speed. For handheld shots, keep your shutter speed at least 1/100th of a second to reduce motion blur, especially in low-light settings.